
Services
Tuning
We love rock bands and we love to go to their concerts so it'd be great if we could check out if they have upcoming shows close to us. Also, we'll put up a user settings page so that users can see concert dates in the format they are most used to.
These are the main feature we'll implement in this chapter with another Ember.js building block, services. Services serve the purpose of storing state and implementing cross-cutting concerns that are not specific to any individual page or component. We have already been using a great number of them, like the store (from Ember Data), the router (from Ember proper) or the session (provided by Ember Simple Auth).
As usual, we'll modify our app in other ways to accommodate the new feature.
New styles
 1/* app/styles/app.css */
 2+.w-15 {
 3+   width: 15%;
 4+}
 5+.striped--near-white:nth-child(even) > td {
 6+   color: var(--near-white);
 7+}
 8+
 9+.striped--near-white:nth-child(odd) > td {
10+   color: var(--mid-grey);
11+}
12+
13+.rr-link-button {
14+   background-color: transparent;
15+   color: var(--near-white);
16+   border: 0;
17+   border-bottom: 1px solid var(--near-white);
18+   padding: 0;
19+   cursor: pointer;
20+}
Moving the editing of bands to a dedicated route
The first thing which is not strictly needed to implement the features but is nevertheless nice to have is assigning the editing of a band its own route. Currently, the band details page serves that purpose but it's a bit of a mix of displaying and editing band data so it'd make sense to have a dedicated edit page to clear things up.
Let's start by creating the route:
1$ ember g route bands/band/edit
Instead of flipping between "show" and "edit" modes on the band's details page, we'll just link to the newly created edit page. The template thus becomes quite simple (not showing the diff because it'd be far more confusing):
We can now turn our attention to the new page, bands.band.edit which is completely empty for the moment. We could try putting all the logic in the controller and the template but just as we ended up putting it in a musician-form component in the previous chapter, we can "proactively" do the same here, and use a band-form UI component, as it's a more convenient way to work with forms:
1$ ember g component band-form
The form should allow editing the band's name and description, save or discard changes and display error messages as appropriate.
Here is the template in its entirety:
We can see that in order to make this work, we'll need to
- Pass in
bandto the component from the route template - Add a
namevalidation to the band model - Set up
showErrorsandisButtonDisabled - Define the
saveBandanddiscardChangestasks
Let's go from top to bottom and invoke the component from the bands.band.edit template:
That was a piece of cake as the model is already correctly set since it's inherited from the parent route, bands.band.
Next, the year-of-formation validator is already added to the Band model, we only need to add a presence validator for the name:
 1// app/models/band.js
 2// (...)
 3const Validations = buildValidations({
 4+  name: [
 5+    validator('presence', {
 6+      presence: true,
 7+      ignoreBlank: true,
 8+      message: "Name can't be empty"
 9+    }),
10+  ],
11  description: [
12    validator('length', {
13      min: 12,
14      message: "The description needs to be at least 12 characters"
15    }),
16    validator('year-of-formation')
17  ]
18});
We can now move on to setting up the showErrors object to indicate which errors (if present) need to be shown. We can do this in the contstructor of the component, the init method:
The isButtonDisabled follows the usual pattern of our form components: it's either disabled if some validations are failing or if the submit action is running:
One of the advantages that using a component for a form gives us is that transient state (like whether to show error message or not) is aligned with the component's lifecycle. As components are destroyed when they are no longer rendered on the screen, state attributes die with them and so state doesn't need to be explicitly managed as it'd be the case if we defined it on the controller.
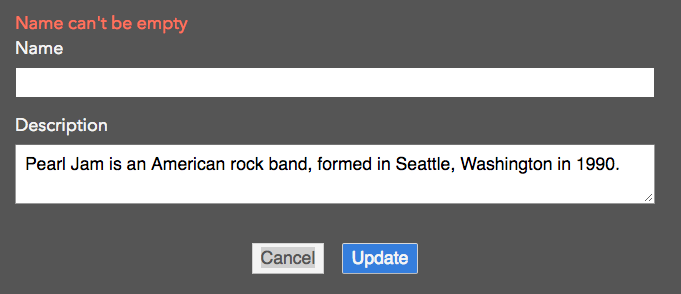
With these in place, when you delete the name of a band, you should see the validation error:
Let's move on to adding the save and cancel actions, which we'll implement as EC tasks:
 1// app/components/band-form.js
 2+import { inject as service } from '@ember/service';
 3+import { task } from 'ember-concurrency';
 4
 5export default Component.extend({
 6+  router: service(),
 7+
 8  //  (...)
 9+  saveBand: task(function* (event) {
10+    event.preventDefault();
11+    yield this.band.save();
12+    yield this.router.transitionTo('bands.band.details', this.band.id);
13+  }),
14+
15+  discardChanges: task(function* () {
16+    this.band.rollbackAttributes();
17+    yield this.router.transitionTo('bands.band.details', this.band.id);
18+  }),
19});
There is nothing new here and with these in place, our form is now complete and we can update a band's details on a separate page.
We also have some clean-up to do in the details route. As we're not editing anything here any more, the resetController hook and the willTransition action can be removed:
 1// app/routes/bands/band/details.js
 2export default Route.extend({
 3   // (...)
 4-  resetController(controller) {
 5-    controller.set('isEditing', false);
 6-  },
 7-
 8-  actions: {
 9-    willTransition(transition) {
10-      let bandNotSaved = this.controller.model.hasDirtyAttributes;
11-      if (bandNotSaved) {
12-        let leave = window.confirm("You might lose your changes you've made to the band's details. Are you sure?");
13-        if (!leave) {
14-          transition.abort();
15-        }
16-      }
17-    }
18-  }
19});
Showing concerts for a band
We can now start working on the main feature for this chapter, showing nearby concerts for the logged in user. We'll use a couple of services to achieve that and create one of our own.
First things first, let's again create a route for the new page, Concerts:
1$ ember g route bands/band/concerts
Add the new page as a navigation tab in the bands.band template:
The new page is empty and we have to fetch a list of concerts to fill it up.
The concert data is provided by Songkick (thank you, Songkick!), so we'll have to query their API. In order to do that, an artist ID needs to be known for each band. I made sure that this is supplied by the back-end, so all we have to do is to add this attribute to the band model:
The artist id allows us to compose the URL to query the Songkick API. So far, we have mostly used Ember Data's high-level store methods to send requests to external APIs (our own back-end) but in this case we don't need full-fledged ED records for the concerts with all the extras it provides (identity map, relationship management, easy creation/update, etc.), so we'll use a simple fetch and display the returned data.
Let's start by installing the ember-fetch add-on:
1$ ember install ember-fetch
Let's now write the model hook that fetches the relevant concert data:
 1// app/routes/bands/band/concerts.js
 2import Route from '@ember/routing/route';
 3+import fetch from 'fetch';
 4+import { inject as service } from '@ember/service';
 5+import ENV from 'rarwe/config/environment';
 6
 7export default Route.extend({
 8+  session: service(),
 9+
10+  async model() {
11+    let band = this.modelFor('bands.band');
12+    let { token } = this.get('session.data.authenticated');
13+    let concertsURL = `/bands/${band.id}/concerts`;
14+    if (ENV.apiHost) {
15+      concertsURL = `${ENV.apiHost}/${concertsURL}`;
16+    }
17+    let response = await fetch(concertsURL, {
18+      headers: {
19+        'Authorization': `Bearer ${token}`
20+      }
21+    });
22+    return await response.json();
23+  }
24});
This is similar to how we sent a request manually in authenticators/credentials.js. We set the authorization token in the Authorization header and send the request on its way to the back-end URL which is available at /bands/:band-slug/concerts.
Next up is rendering those shows in the template. model contains the list of shows so the template can just cycle through them:
(If you build the app yourself locally, please download the "Powered by Songkick" logo from https://s3-eu-west-1.amazonaws.com/rarwe-book/powered-by-songkick-white.svg and place it in the app's public/images folder so that it's displayed correctly.)
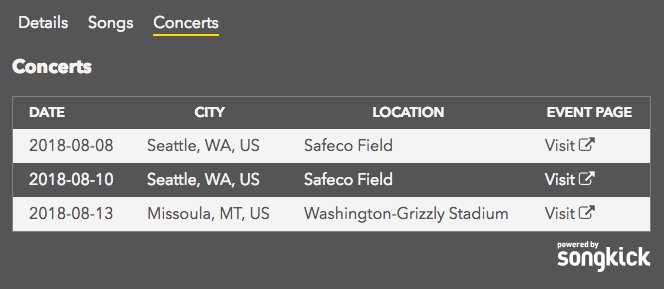
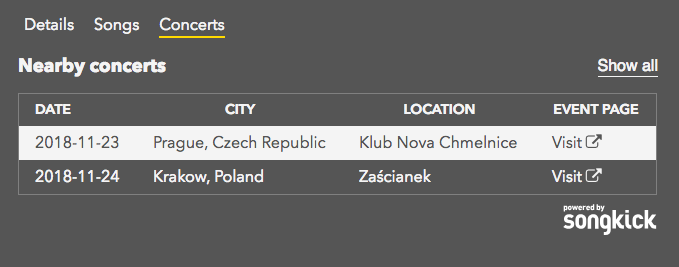
At this point, you should see all the upcoming concerts listed for the band:
How to see concerts for my bands?
To see the concerts for a band, its songkickArtistId needs to be set to the correct value. The backend takes care of that for a handful of bands so if you're building the app along the book, pick one of them to see concert data. They are
- Pearl Jam
- Led Zeppelin
- Foo Fighters
- Radiohead
- Red Hot Chili Peppers
- Royal Blood
- Caspian
- Long Distance Calling
- Them Crooked Vultures
- Alice in Chains
- God is an Astronaut
- If These Trees Could Talk
- Moonlit Sailor
- Mogwai
If you'd like a band to be added, just let me know and I'll add it.
Showing nearby concerts (Stage 1)
So far so good, but we'd like to enable users to only see concerts that are close to them and so have a chance of attending.
In order to do that, we'll need to know where the user is, so we need to ask for her permission to retrieve her location. Fortunately, there is an add-on (also) for this that makes this process quite simple. It's called ember-cli-geo so let's install it:
1$ ember install ember-cli-geo
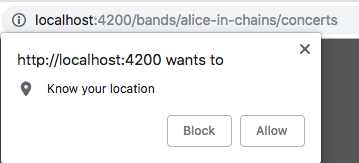
The main entry point to using geolocation with the add-on is its geolocation service (you see, another service), on which we can call getLocation. That prompts the user to grant permission and returns their location if the permission is granted.
Let's wire this up now.
The important bit is the addition of the "Only show nearby" toggle which should call the filterConcerts task. That task, in turn, should ask for the user's location if it's not yet known and then filter the list down to nearby concerts.
That task has to live on the controller so it has to be created first:
1$ ember g controller bands/band/concerts
We can then add the task:
 1// app/controllers/bands/band/concerts.js
 2import Controller from '@ember/controller';
 3+import { inject as service } from '@ember/service';
 4+import { readOnly } from '@ember/object/computed';
 5+import { task } from 'ember-concurrency';
 6
 7export default Controller.extend({
 8+  showConcerts: 'all',
 9+
10+  geolocation: service(),
11+  userLocation: readOnly('geolocation.currentLocation'),
12+
13+  filterConcerts: task(function* () {
14+    if (!this.userLocation) {
15+      yield this.get('geolocation').getLocation();
16+    }
17+    this.set('showConcerts', 'nearby');
18+  })
19});
If the user's geolocation (stored in the currentLocation property of the service) is unknown, we query for it via the geolocation service and then switch the page to only show nearby concerts. showConcerts defines whether all or only nearby concerts should be displayed.
When the button is clicked, the browser asks the user if they want to allow the app to know their location.
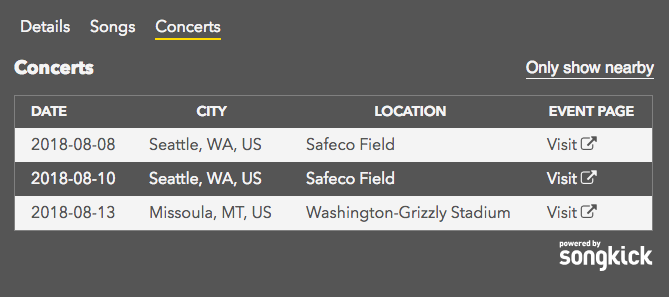
That works but nothing changes on the page, as there's no difference between showing all and only nearby concerts on the page.
Let's code up a "quick and dirty" (or rather, "quick and incorrect") solution to switch between showing all and nearby concerts and later make it right.
Let's pretend that nearby concerts are all of the concerts except the last one:
 1// app/controllers/bands/band/concerts.js
 2+import { computed } from '@ember/object';
 3
 4export default Controller.extend({
 5  // (...)
 6+  concerts: computed('showConcerts', 'model.[]', function() {
 7+    if (this.showConcerts === 'all') {
 8+      return this.model;
 9+    }
10+    return this.model.slice(0, -1);
11+  }),
12  // (...)
13});
We should take care to switch to going through concerts (and not model) in the template:
Great, this part works now, but we should also show the correct label on the button and actually switch between showing all or only nearby concerts in the filterConcerts task. Let's make these changes.
 1// app/controllers/bands/band/concerts.js
 2-import { readOnly } from '@ember/object/computed';
 3+import { readOnly, equal } from '@ember/object/computed';
 4
 5export default Controller.extend({
 6  // (...)
 7+  showingAll: equal('showConcerts', 'all'),
 8+  showingNearby: equal('showConcerts', 'nearby'),
 9
10-  concerts: computed('showConcerts', 'model.[]', function() {
11+concerts: computed('showingAll', 'model.[]', function() {
12-    if (this.showConcerts === 'all') {
13+    if (this.showingAll) {
14      return this.model;
15    }
16    return this.model.slice(0, -1);
17  }),
18
19  filterConcerts: task(function* () {
20    if (!this.userLocation) {
21      yield this.get('geolocation').getLocation();
22    }
23-    this.set('showConcerts', 'nearby');
24+    this.set('showConcerts', this.showingAll ? 'nearby' : 'all');
25  })
26});
Now, for the changes in the template:
As a nice UI touch, we should let the user know that we're getting their location as it can take a little bit of time during which the app gives no indication of what's happening. Piece of cake with EC tasks:
And we're done with the fake solution, we can now start implementing the real thing.

Showing nearby concerts (Stage 2)
As the next step, we'd like to calculate the distance between each concert and the user's location and, when showing nearby concerts, filter the list of concerts down to those which are closer than a given, fixed distance.
In order to not write code for calculating geographical distances, we'll use the geolib npm package. To be able to use a npm package just like that, we'll need to add the ember-auto-import add-on, so let's install that one first:
1$ ember install ember-auto-import
We can now install the geolib package:
1$ npm install --save-dev geolib
(or yarn add --dev geolib)
Armed with geo-distance calculating abilities, we can now modify the concerts CP to only return nearby concerts:
 1// app/controllers/bands/band/concerts.js
 2+import geolib from 'geolib';
 3
 4+const nearbyDistance = 500 * 1000; // 500km
 5
 6export default Controller.extend({
 7  // (...)
 8-  concerts: computed('showingAll', 'model.[]', function() {
 9+  concerts: computed('showingAll', 'model.[]', 'userLocation', function() {
10    if (this.showingAll) {
11      return this.model;
12    }
13-    return this.model.slice(0, -1);
14+    let [userLat, userLng] = this.userLocation;
15+    return this.model.filter((concert) => {
16+      let { lat, lng } = concert.location;
17+      let distanceToConcert = geolib.getDistance(
18+        { lat: userLat, lng: userLng },
19+        { lat, lng }
20+      );
21+      return distanceToConcert < nearbyDistance;
22+    });
23  }),
24  // (...)
25});
For each concert, location.lat and location.lng contains the coordinates, while userLocation stores these in an array. The actual calculation is done by geolib.getDistance, which returns the result in meters.
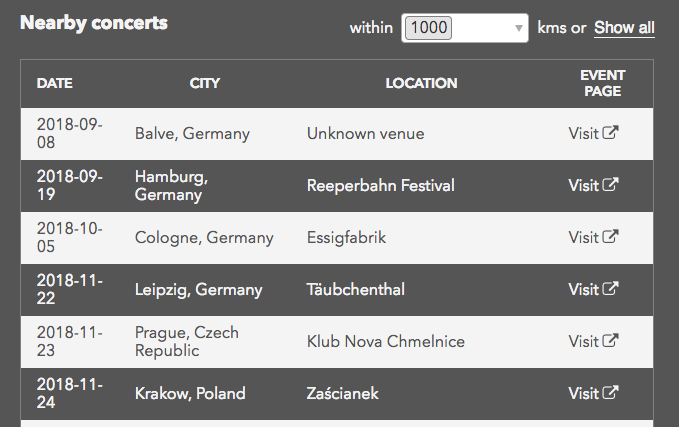
Living in Central Europe, I needed to switch to "Long Distance Calling" (an excellent German hard rock band) to verify that getting nearby concerts works – and it does:
Before we move on to another feature, let's allow the user to set how far they are willing to travel for a concert – the radius within which concerts are considered nearby.
In "nearby concerts" mode, instead of a fixed distance, we'll have a dropdown with a couple of options. When the user picks one of them, the list should refresh with the concerts that are that close or closer.
Let's make the changes in the controller first:
 1// app/controllers/bands/band/concerts.js
 2-const nearbyDistance = 500 * 1000; // 500km
 3
 4export default Controller.extend({
 5   // (...)
 6+  selectedDistance: 500,
 7+
 8+  init() {
 9+    this._super(...arguments);
10+    this.set('nearbyDistances', [200, 500, 1000, 2000]);
11+  },
12-  concerts: computed('showingAll', 'model.[]', 'userLocation', function() {
13+  concerts: computed('showingAll', 'model.[]', 'userLocation', 'selectedDistance', function() {
14    // (...)
15    return this.model.filter((concert) => {
16      let { lat, lng } = concert.location;
17      let distanceToConcert = geolib.getDistance(
18        { lat: userLat, lng: userLng },
19        { lat, lng }
20      );
21-      return distanceToConcert < nearbyDistance;
22+     return distanceToConcert < (this.selectedDistance * 1000);
23    });
24  },
25}),
26});
That wasn't too bad. The template needs to change to accommodate the distance selector and also to make sure it's only shown when nearby concerts are shown.
That's quite a bit so let me elaborate. The new UI item is the nearby distance selector which should only be there when nearby concerts are selected (if showingNearby is true). Then we have the selector itself whose options are provided by nearbyDistances (the property we've just defined in the controller) and the selected one is selectedDistances (500 by default). So that they are nicely aligned, they are wrapped in a flex container, hence the new div on line 16.
With these changes, users who are willing to travel further can set a bigger distance.
Turns out I have a lot more options for a Long Distance Calling concert withing 1000 kilometers:
Adding user settings
To start, let's sketch out the feature we're going to build.
- We'd like to have a user settings page where two options can be set. The unit preference (
metricorimperial) and the preferred date format. - We'll then extract the fetching of the current user into its service so that it can easily be accessed from anywhere.
- The concerts page should then take into account whether the user prefers distances in kilometers or miles.
- The concerts page should then show dates according to user preference.
That's the list we'll go down on, so let's start with the first item, adding the user settings page.
First, two properties needs to be added to the user model that store the above preferences:
Next, the new page needs to be created:
1$ ember g route settings
Let's link to that page from the email address of the logged in user, in the top navbar:
If we click on the email address, the resulting page comes up empty, so our next step should be fetching the current user and allowing the user preferences to be set on the page.
The current user can be fetched from the /users/me endpoint on the backend, so we'll again drop down a level from Ember Data's store abstractions and write out the request and pushing the returned user to the store ourselves. Let's see how.
 1// app/routes/settings.js
 2import Route from '@ember/routing/route';
 3+import { inject as service } from '@ember/service';
 4+import fetch from 'fetch';
 5
 6export default Route.extend({
 7+  session: service(),
 8+
 9+  async model() {
10+    let { token } = this.session.data.authenticated;
11+    let currentUserURL = '/users/me';
12+    if (ENV.apiHost) {
13+      currentUserURL = `${ENV.apiHost}/${currentUserURL}`;
14+    }
15+    let response = await fetch(currentUserURL, {
16+      headers: {
17+        "Authorization": `Bearer ${token}`
18+      }
19+    });
20+    let payload = await response.json();
21+    let store = this.store;
22+    let User = store.modelFor('user');
23+    let serializer = store.serializerFor('user');
24+
25+    let jsonApiPayload = serializer.normalizeResponse(store, User, payload, null, 'query');
26+    return this.store.push(jsonApiPayload);
27+  }
28});
The fetch needs no further explanation (we saw it when we fetched the list of concerts) but handling the returned payload does. The payload needs to be serialized to conform to ED's internal format and that's what the last four lines do (pushPayload did something similar but it is now deprecated).
At the end of this, we have pushed the logged in user record to the store and have set it as the model of the controller. We can now implement the UI functionality.
Just as before, we'll already create a form for the user, so let's get this out of the way:
1$ ember g component user-form
Having done that, the settings template can be kept dead simple:
The component JS file and the related template doesn't contain anything we hadn't seen so I'm just going to copy them here in their entirety:
 1// app/components/user-form.js
 2import Component from '@ember/component';
 3import { inject as service } from '@ember/service';
 4import { task } from 'ember-concurrency';
 5
 6export default Component.extend({
 7  router: service(),
 8
 9  init() {
10    this._super(...arguments);
11    let dateFormats = [
12      { value: 'YYYY-MM-DD', example: '2018-07-31' },
13      { value: 'DD-MM-YYYY', example: '31-07-2018' },
14      { value: 'MM-DD-YYYY', example: '07-31-2018' },
15    ];
16    this.set('dateFormats', dateFormats);
17    this.set('units', ['metric', 'imperial']);
18    let usersDateFormat = dateFormats.find((format) => {
19      return format.value === this.user.dateFormat;
20    });
21    this.set('selectedFormat', usersDateFormat);
22  },
23
24  saveUser: task(function* (event) {
25    event.preventDefault();
26    yield this.user.save();
27    yield this.router.transitionTo('index');
28  }),
29
30  discardChanges: task(function* () {
31    this.user.rollbackAttributes();
32    yield this.router.transitionTo('index');
33  }),
34
35  actions: {
36    updateSelectedFormat(format) {
37      this.set('selectedFormat', format);
38      this.user.set('dateFormat', format.value);
39    }
40  }
41});
Updating the preferred date format is a tad more complicated because the options are POJOs (Plain Old Javascript Objects) as we need both the value to save (for example, 'YYYY-MM-DD') and an example to show to the user (2018-07-31).
Here is the template:
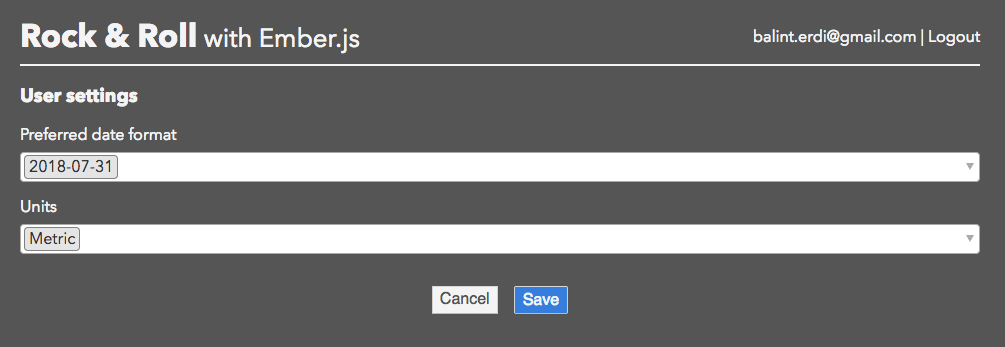
The finished settings page should look something like this:
Before we forget, let's protect the settings page so that it cannot be accessed by unauthorized users:
Defining a current-user service
Since we'll want to get hold of the current user from different parts of the application (for example, the concerts page to see how dates should be displayed), it would make sense to extract the management of the current user into a service. The service would load (and unload) the current user and also give access to its properties. Let's start by creating the service itself:
1$ ember g service current-user
Its load method would fetch the current user from the back-end, while unload would unset it. We've already implemented the mechanics in the settings route, it just needs to be moved:
 1// app/services/current-user.js
 2import Service from '@ember/service';
 3+import { inject as service } from '@ember/service';
 4+import fetch from 'fetch';
 5
 6export default Service.extend({
 7+  user: null,
 8+
 9+  session: service(),
10+  store: service(),
11+
12+  async load() {
13+    if (!this.session.isAuthenticated) {
14+      return;
15+    }
16+    let { token } = this.session.data.authenticated;
17+    let currentUserURL = '/users/me';
18+    if (ENV.apiHost) {
19+      currentUserURL = `${ENV.apiHost}/${currentUserURL}`;
20+    }
21+    let response = await fetch(currentUserURL, {
22+      headers: {
23+        "Authorization": `Bearer ${token}`
24+      }
25+    });
26+    let payload = await response.json();
27+    let store = this.store;
28+    let User = store.modelFor('user');
29+    let serializer = store.serializerFor('user');
30+
31+    let jsonApiPayload = serializer.normalizeResponse(store, User, payload, null, 'query');
32+    let user = this.store.push(jsonApiPayload);
33+    this.set('user', user);
34+  },
35+
36+  unload() {
37+    this.set('user', null);
38+  }
39});
The only difference is that instead of returning the pushed user record, the service sets it as its user property.
The settings route can now be trimmed down to load the current user and then return it:
 1// app/routes/settings.js
 2-import fetch from 'fetch';
 3
 4export default Route.extend(AuthenticatedRouteMixin, {
 5-  session: service(),
 6+  currentUser: service(),
 7
 8  async model() {
 9-    let { token } = this.session.data.authenticated;
10-    let currentUserURL = '/users/me';
11-    if (ENV.apiHost) {
12-      currentUserURL = `${ENV.apiHost}/${currentUserURL}`;
13-    }
14-    let response = await fetch(currentUserURL, {
15-      headers: {
16-        "Authorization": `Bearer ${token}`
17-      }
18-    });
19-    let payload = await response.json();
20-    let store = this.store;
21-    let User = store.modelFor('user');
22-    let serializer = store.serializerFor('user');
23-
24-    let jsonApiPayload = serializer.normalizeResponse(store, User, payload, null, 'query');
25-    return this.store.push(jsonApiPayload);
26+    await this.currentUser.load();
27+    return this.currentUser.user;
28  }
29);
So far so good, when we reload the settings page, it keeps working as before.
However, if we count on using the current user via the service from the Concerts page, too (and later, from other pages), we have to make sure that we call the load method on the service whenever the session changes its state.
This happens when a user logs in, logs out and when a session is restored (from a stored token). Let's cover the first two cases first.
Ember Simple Auth provides callbacks on the session service whenever authentication succeeds or when the session is invalidated. These are respectively the authenticationSucceeded and invalidationSucceeded events.
The best place to react to these events is an instance initializer, so let's set one up.
1$ ember g instance-initializer current-user
 1-export function initialize(/* appInstance */) {
 2+export function initialize(appInstance) {
 3+  let session = appInstance.lookup('service:session');
 4+  let currentUser = appInstance.lookup('service:current-user');
 5+  session.on('authenticationSucceeded', function() {
 6+    currentUser.load();
 7+  });
 8+  session.on('invalidationSucceeded', function() {
 9+    currentUser.unload();
10+  });
11}
12
13export default {
14  initialize
15};
Unfortunately, that doesn't cover the third case, restoring a previous session as authenticationSucceeded is not called in that scenario. If only there was a hook that always gets called upon booting up the app...
The beforeModel hook of the application route is such a place. No matter which route is initially transitioned to, the application route is always on the active route path, so its hooks get run.
We haven't needed to put extra logic on the application route yet, so we first have to create it:
1$ ember g route application
(we should say a definite "no" to whether our application template should be overridden.)
Ok, we can now add the short code snippet to load the current user:
All our bases are now covered, the current user will always be correct in the service. That also means we can delete its explicit loading in the settings route and focus on customizing the concerts page according to user prerence.
Customizing the concerts page
The two customizations we want to make on the Concerts page is choosing the preferred unit of distance (kms or miles) and the date format to use for concert dates. We need the current-user service for both of these.
Let's first open the controller since calculating distances happens there, and add a little bit of code:
 1// app/controllers/bands/band/concerts.js
 2+const milesToKilometers = 1.61;
 3
 4export default Controller.extend({
 5  // (...)
 6+  currentUser: service(),
 7+  useMiles: readOnly('currentUser.user.prefersImperial'),
 8
 9-  concerts: computed('showingAll', 'model.[]', 'userLocation', 'selectedDistance', function() {
10+  concerts: computed('showingAll', 'model.[]', 'userLocation', 'maxDistance', function() {
11    // (...)
12    return this.model.filter((concert) => {
13      let { lat, lng } = concert.location;
14      let distanceToConcert = geolib.getDistance(
15        { lat: userLat, lng: userLng },
16        { lat, lng }
17      );
18-     return distanceToConcert < (this.selectedDistance * 1000);
19+     return distanceToConcert < this.maxDistance;
20  }),
21
22+  maxDistance: computed('selectedDistance', 'useMiles', function() {
23+    return this.selectedDistance * 1000 * (this.useMiles ? milesToKilometers : 1);
24+  }),
25});
To keep it simple, we treat the set of distances in the dropdown as miles if the user prefers it. Consequently, our (mostly American, I assume) users will see concerts in a somewhat (1.6x) bigger radius from their location, but that's okay here.
We access a prefersImperial property on the User model above, but we haven't yet defined it:
Our work in the rendering context done, we can now pull up the template to make the tiny change of showing the right distance unit:
And that's it, the user's preferred unit of distance gets used (and displayed):

Regarding displaying concert dates, we'll use ember-moment to do the heavy lifting for us, so let's install the add-on:
1$ ember install ember-moment
ember-moment provides a helper called moment-format that displays a date in the given format, which we can use in our template:
let is a great built-in helper that defines variables for its block. The first argument becomes the first argument yielded to the block, the second argument becomes the second, and so on. In our case, the date variable inside the block is concert.start.date, while format is equal to currentUser.user.dateFormat.
moment-format checks the number of arguments so we can't just use {{moment-format date format}} in case the user hasn't yet set a preferred format and rely on having a missing argument treated the same way as a falsy one. That's why explicitly checking if format is set is needed.
In the default case, when moment-format is only called with one argument, it outputs dates in a default format, which must be set explicitly in the configuration, so let's add it:
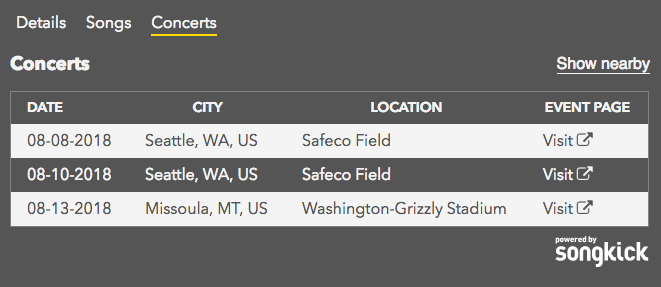
Concert dates are now displayed according to user preference (and fall back to "YYYY-MM-DD" when it's unknown):
Summary
We've come a long way in this chapter so let's do a quick summary. We started by extracting the band's form onto its own page. Then we created a new page to show upcoming concerts for bands, connecting to an external API, Songkick, to retrieve data. We made it possible for users to constrain the list of concerts to those close to them by getting their location and allowing them to choose what "close" means.
We have then introduced the concept of the current user and implemented it in the current-user service. The new settings page leveraged this service and allowed setting user preferences about how distances and dates should be displayed. Finally, we've used these user preferences on the Concerts page.
The roadie says
There are a few files lying around that serve no purpose. The controller belonging to the bands.band.details route and the bands.band.edit route:
Next song
In this chapter we've added valuable features – our app now sings and dances (at least I'm sure about the singing part). However, it doesn't degrade very well. If network connection is missing, for example, it doesn't even load. And if we don't want to build a native app for all mobile operating systems (and we don't), we should bring it closer to the native mobile app feel.
It's turning our app to a progressive web app we're after.