11 December 2013
Ember.js is an outstanding client-side framework for building single-page applications. To make your application truly come to life, Firebase, being a real-time backend, is a natural choice as the server-side component.
Sending data between the server and the client is a task all web applications have to address. However, if one uses the Firebase-Ember.js stack, this problem is largely abstracted away by these wonderful frameworks.
To make them work together, the Firebase team released their official Ember.js bindings, emberFire.
How does it work?
Before we look at the making of the actual application it is important to understand how the emberFire library works.
It is built on two primitives, EmberFire.Object and EmberFire.Array. These extend Ember.ObjectProxy and Ember.ArrayProxy, respectively. These proxy objects delegate any get and setProperty calls that are not defined on the proxy to an underlying content object.
What this means is that we can work with Firebase references in our application as if they were Ember objects. In the case of a single object, setting a property will cause a child with that name to be written with the passed value. When working with an array, the usual array methods (e.g pushObject) can be used and they will do the right thing in the underlying Firebase reference (e.g push the new node).
Setting up the environment
To set up the necessary dependencies, it is easiest to download the latest Ember starter kit and add the following script tags to the main template:
With that in place, we can start developing. For the sake of focusing on one single issue at a time, the code snippets in this post do not always exactly match those in the actual application. If you want to see them in their entirety, you can always check the source code on Github.
The Idealist
The application we are going to build is an "Idealist". Users can submit ideas and vote on existing ones.
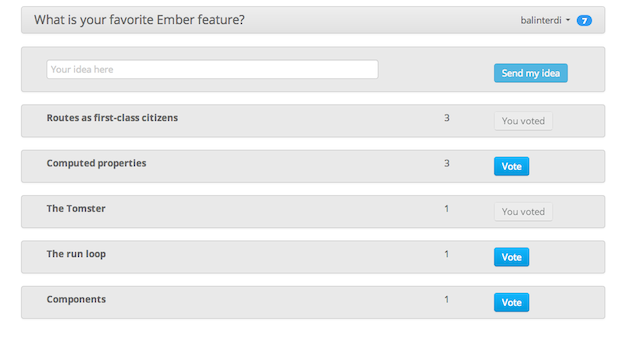
When one loads the application it looks like the following:

A list of ideas is displayed along with the number of votes for that idea and a button to vote that idea up.
To get the existing ideas from Firebase, we use the model hook of the appropriate route:
This loads the ideas in an EmberFire.Array and then iterates through them in the ideas template:
So how does adding a new idea happen? If we take a look at the ideas/new template, we can see that clicking on the "Send my idea" button triggers the sendIdea action:
The triggered sendIdea action is then handled on the controller:
 1App.IdeasNewController = Ember.ObjectController.extend({
 2  title: '',
 3
 4  actions: {
 5    sendIdea: function() {
 6      var newIdeaRef = new Firebase(ideasPath).push();
 7      var newIdea = EmberFire.Object.create({ ref: newIdeaRef });
 8      newIdea.setProperties({
 9        id: newIdeaRef.name(),
10        title: this.get('title'),
11        submittedBy: this.get('auth.currentUser.id'),
12        timestamp: new Date(),
13        voteCount: 0
14      });
15      this.set('title', '');
16    }
17  }
18
19});
We get a reference with a unique id by using Firebase's push operation. We create an EmberFire.Object with that reference and that enables us to do our magic with the help of Firebase. When we then set any property on the object, it is going to be persisted on our backend and synchronized to all clients.
Extending the EmberFire classes
Up until this point, we did not need to create our own model classes. The basic EmberFire classes were sufficient for our needs. However, if we need to define additional behavior for our models, we have to extend these primitives.
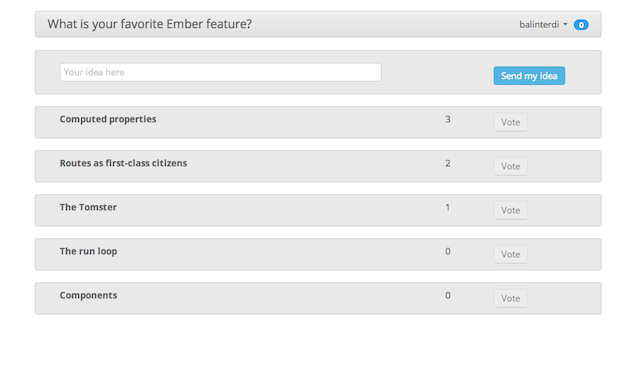
Suppose, for example, that each user has a certain number of votes and we want to prevent further voting when she does not have any votes left, as shown on the next mockup:

We can define a computed property on the user that would tell whether she has any votes left. Computed properties in Ember are properties that depend on other -computed or "normal"- properties and get automatically updated when one of the dependent properties change.
To do that, we need to define our User model:
The above is a computed macro definition that defines noVotesLeft as true if the votesLeft property of the user is less than or equal to zero.
Then, in the template that renders each idea, we disable the button if that computed property is true and also give it a grey hue to indicate its disabled state:
Keep in mind that the context of the template is an idea and our computed property is defined on the user, hence the need for auth.currentUser.noVotesLeft.
Wait, there is more
Taking things a step further, I have also integrated Firebase's SimpleLogin authentication service and prevented the same user to vote on the same idea multiple times. If you wish to see how these are implemented, I encourage you to check out the source code of the project.
I hope I got you interested in learning more about how to build real-time web applications and gave you a basic example of how to use state-of-the-art tools to do so.
Share on Twitter